

A beginner’s makeup guide showing how to apply makeup step-by-step for beginners, with the right application and blending techniques, beginner-friendly tips, and simple steps to create a natural everyday look while avoiding common makeup mistakes.
Makeup looks so easy when you’re watching a tutorial. But the moment you pick up your own brush, it’s a different story.
You start with full confidence, but end up with too much foundation, uneven blending, and more products on your face than you know what to do with, making that simple YouTube look feel impossible to recreate.
If you are someone starting your makeup journey, this beginner makeup guide is for you. You don’t need a complicated routine or professional skills to create a polished look. You just need the right order, simple techniques, and a little practice.
In this beginner makeup guide, you’ll learn how to:
- Apply makeup step-by-step for beginners, from skin prep to lips
- Use simple techniques to apply and blend makeup with more control
- Create a simple, natural everyday look
- Avoid common beginner mistakes
Let’s get into the makeup guide for beginners.
- What Makeup Items Do Beginners Actually Need?
- Makeup Application Order at a Glance
- How to Apply Makeup Step-By-Step For Beginners
- How Should You Apply and Blend Makeup?
- Step 1: Prep Your Skin
- Step 2: Apply Your Base
- Step 3: Apply Concealer Where You Need It
- Step 4: Add Bronzer or Contour — Do You Need Both?
- Step 5: Set Your Makeup With Powder
- Step 6: Apply Blush
- Step 7: Define Your Brows Without Making Them Look Heavy
- Step 8: Apply Simple Eye Makeup
- Step 9: Apply Eyeliner or Kajal (Optional)
- Step 10: Apply Mascara
- Step 11: Apply Lip Liner and Lip Colour
- Step 12: Finish With Setting Spray (Optional)
- A Simple 5-Minute Everyday Makeup Routine for Beginners
- Common Beginner Makeup Mistakes to Avoid
- How to Fix Common Makeup Problems
- Final Thoughts
- FAQs
- 1. What is the correct order to apply makeup for beginners?
- 2. What is the first step in makeup for beginners?
- 3. Do I apply concealer before or after foundation?
- 4. Can I apply makeup without a primer?
- 5. How much foundation should you use as a beginner?
- 6. How do you apply makeup naturally as a beginner?
- 7. Can beginners apply makeup without foundation?
What Makeup Items Do Beginners Actually Need?
You don’t need every makeup product you’ve seen in tutorials. This simple list of makeup items for beginners is enough to create an everyday look:
- Moisturizer
- Sunscreen (for daytime)
- Foundation, skin tint, or BB/CC cream
- Concealer
- Blush
- Brow product
- Mascara
- Lip products
As you get more comfortable with makeup, you can always add more products to your vanity, based on what you enjoy and actually need.
Makeup Application Order at a Glance
Use this quick makeup order as your roadmap before learning how to apply makeup step by step.
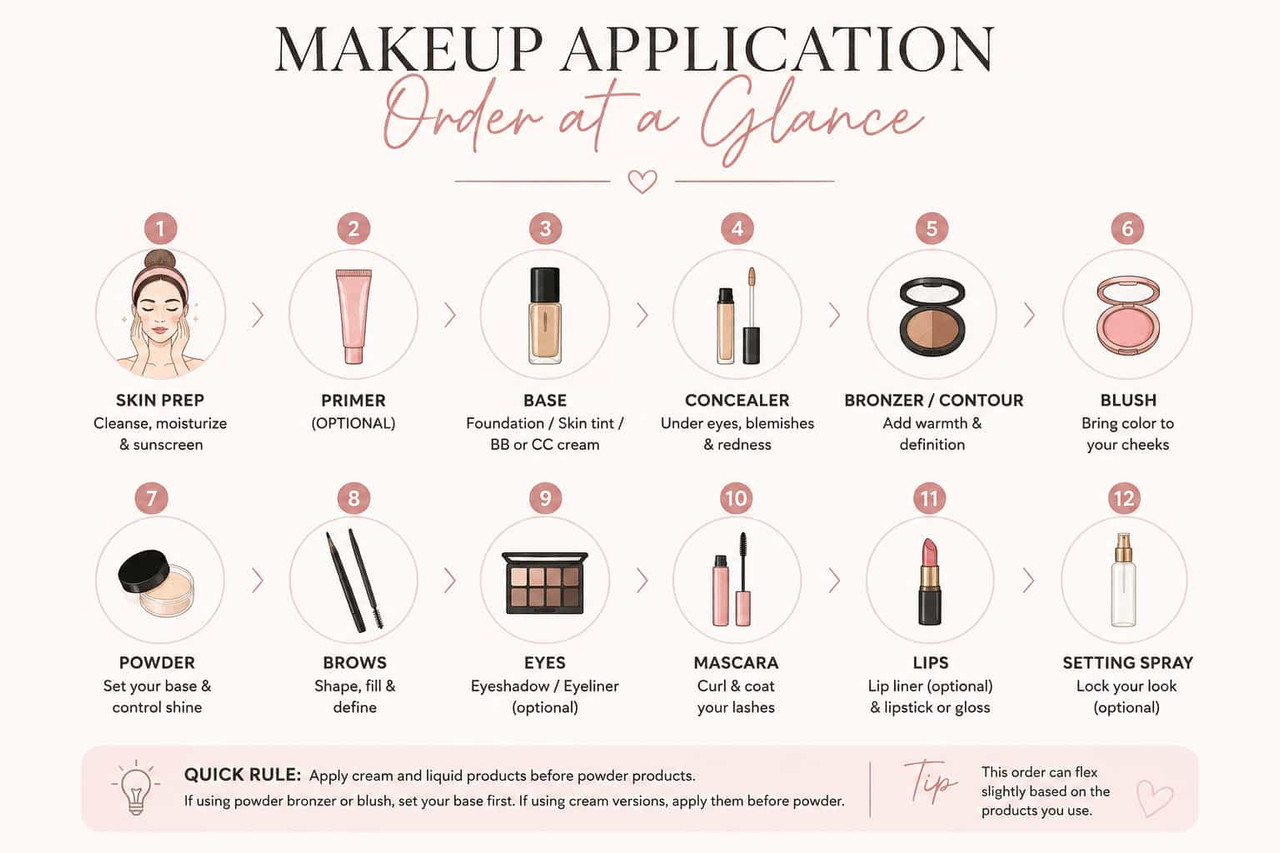
Now that you know what you need and the basic order, let’s put it all together.
How to Apply Makeup Step-By-Step For Beginners
How Should You Apply and Blend Makeup?
You don’t need lots of tools to get a good finish. Choose the one that gives you the most control and suits the product.
- Brush → offers controlled coverage and precise blending, especially for foundation, bronzer, and powder.
- Damp sponge → gives a softer, more diffused finish and works well for pressing and blending liquid or cream products.
- Fingers → work well for sheer products like skin tints and cream formulas. Just make sure your hands are clean.
Learn: How to clean your makeup tools without damaging them
Step 1: Prep Your Skin
Good makeup starts with well-prepped skin. You don’t need a complex routine; just focus on the basics your skin needs before makeup.
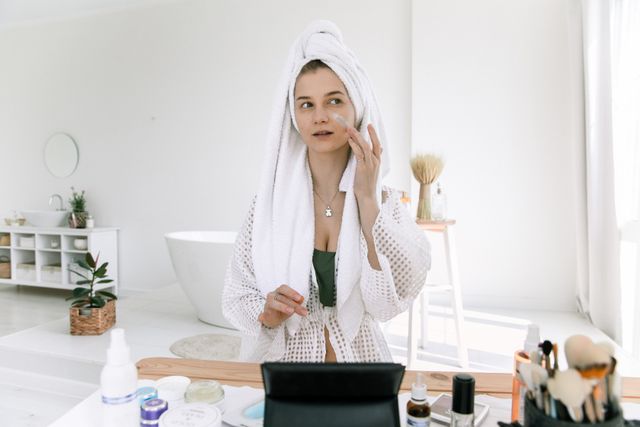
1. Moisturize: Apply a light layer of moisturizer suited to your skin. It helps keep your skin comfortable and creates a smoother base for makeup.
2. Sunscreen: For daytime makeup, apply your broad-spectrum sunscreen before makeup. Use the amount recommended for adequate protection, spread it evenly over your skin, and allow it to settle before applying makeup.
Reminder: Don’t reduce your sunscreen just because you’re applying makeup afterward. Using less than the tested amount can substantially reduce the protection you receive. Makeup may provide some additional UV protection, but it should not replace your dedicated sunscreen.
3. Primer: You don’t need to apply primer everywhere. Professional makeup artists recommend targeted application rather than over-layering primer across the entire face. Use a small amount only where you have a specific concern, and skip it altogether if your moisturizer and sunscreen already give you a smooth base.
- Dry areas → hydrating primer for a smoother, more comfortable base
- Oily areas → mattifying primer to help control shine
- Visible texture → blurring primer to create a smoother-looking surface
- Makeup that moves → gripping primer to help improve longevity
Let your skincare and primer settle before applying makeup. Applying too many wet or heavy layers at once can make your base uneven.
Step 2: Apply Your Base
For beginners, starting with your base keeps the makeup process simple. A good base should enhance your skin while still looking like skin. You don’t need to cover your entire face with layers of foundation or make every part of your skin look completely uniform.
If you’re a beginner, choose your complexion product based on the coverage you want:
- Skin tint or BB/CC cream: lighter, sheer coverage for an easy everyday look.
- Foundation: more coverage when you want to even out redness, discoloration, or unevenness.
How to Apply Your Base
A useful approach for beginners is to start applying foundation from the centre of the face and blending it outward. This keeps more product where you usually need it and helps create a more natural finish.
1. Start small.
Take a small amount of product on the back of your hand. Choose a brush, sponge, or finger to apply it mainly to the center of your face—around the cheeks, nose, chin, and center of the forehead.
2. Blend outward.
Work from the center toward your cheeks, jawline, and hairline. This keeps more coverage where you usually need it while avoiding unnecessary product buildup around the edges.
3. Build only where needed.
Pause and look at your skin before adding more. If some redness or discoloration is still showing, add a thin second layer only to those areas where you need extra coverage. Avoid applying another layer all over your face.
4. Check your edges.
Make sure the foundation is blended around your jawline and hairline, so there isn’t an obvious change between your face and neck.

Expert insight: Makeup artists Lisa Eldridge and Bobbi Brown both emphasize starting with a light layer, keeping coverage where it is needed, blending outward, and building coverage gradually rather than applying too much product at once.
This less-is-more approach gives beginners more control and helps create a natural-looking finish without making your foundation look cakey.
Read: How to avoid cakey makeup and get a flawless base.
Step 3: Apply Concealer Where You Need It
Once you’ve applied your foundation, use concealer only where you need extra coverage, such as under-eye darkness, blemishes, redness, or discoloration. Your foundation has already evened out most of your complexion, so there’s no need to cover your entire face again.
How to Apply Concealer
1. Apply: Place a small amount directly on the area you want to conceal.
2. Tap and blend: Gently tap and press with your fingertip, brush, or slightly damp sponge. Avoid excessive swiping, which can move the product away from the area you’re trying to cover.
3. Build if needed: Check the coverage before adding more, then apply another thin layer only where necessary.

H4: Should Beginners Apply Concealer Before or After Foundation?
For most beginners, foundation first, then concealer is the easiest approach. Once your base is even, you can see exactly where you need extra coverage and avoid a cakey finish.
That said, concealer-first isn’t wrong. It can work well for spot concealing or lighter, minimal-makeup looks. After foundation, use concealer to brighten specific areas or add a little extra definition.
Step 4: Add Bronzer or Contour — Do You Need Both?
You don’t need both. The right choice depends on the look you want.
Bronzer vs. Contour: What’s the Difference?
- Bronzer adds warmth. It gives your complexion a healthy, sun-kissed look and helps bring dimension back to the face after applying foundation.
- Contour adds definition. It mimics natural shadows and typically uses neutral-to-cool, muted tones rather than warm ones.
For a simple everyday look, bronzer is usually the easier place to start. Add contour when you specifically want more definition.
How to Apply Bronzer
1. Start small: Pick up a small amount of product with a brush and tap off any excess on the back of your hand.
2. Place: Focus on the outer areas of your face, such as the forehead, cheekbones, and jawline, where natural warmth would appear.
3. Blend: Use light, controlled back-and-forth or tapping motions, blending toward the hairline. Soften the edges until the bronzer melts naturally into your base.
4. Build gradually: Assess the colour before adding more. Aim for controlled diffusion, not a visible stripe of colour.

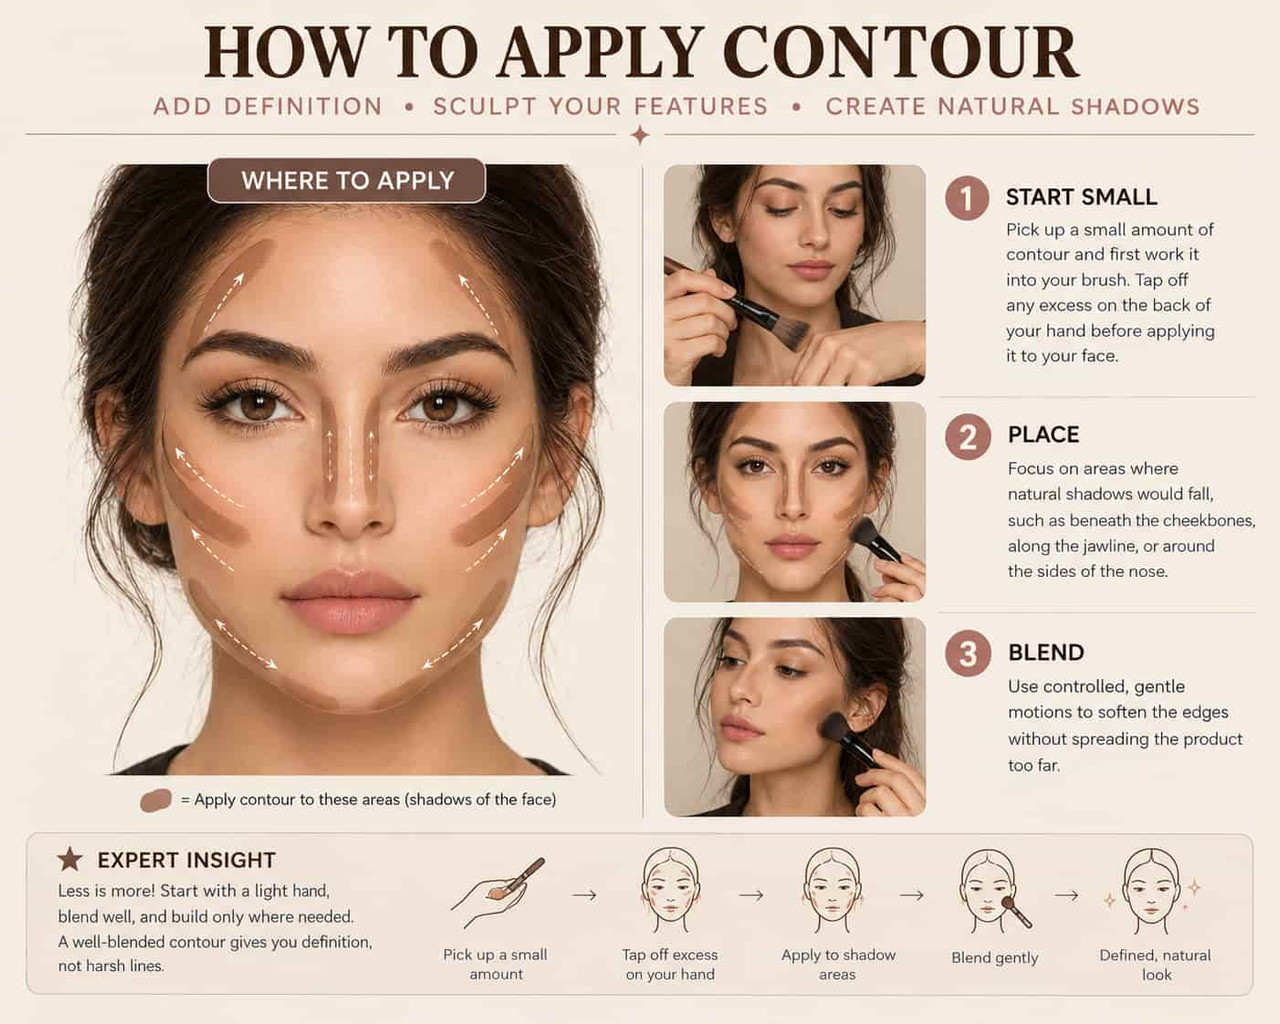
How to Apply Contour
1. Start small: Pick up a small amount of contour and first work it into your brush. Tap off any excess on the back of your hand before applying it to your face.
2. Place: Focus on areas where natural shadows would fall, such as beneath the cheekbones, along the jawline, or around the sides of the nose.
3. Blend: Use controlled, gentle motions to soften the edges without spreading the product too far.
Once your cream and liquid products are blended, you can set the areas that need it with powder.
Step 5: Set Your Makeup With Powder
Powder can help control shine, prevent creasing, and extend the wear of your makeup. But powder should set your makeup, not bury it, so focus on the areas that actually need it.
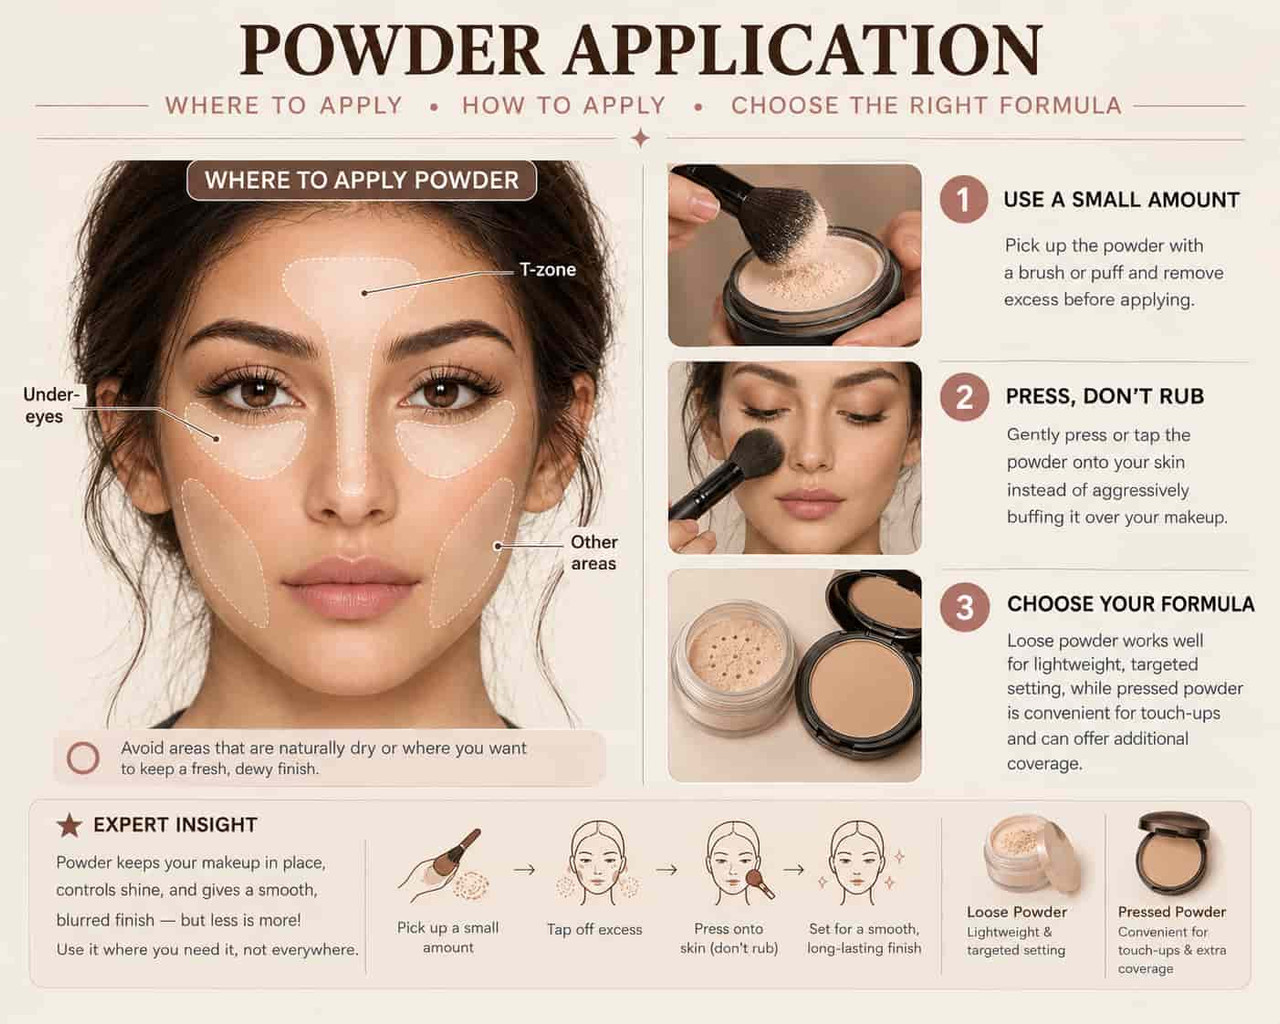
Where Should You Apply Powder?
Avoid areas that are naturally dry or where you want to keep a fresh, dewy finish. Focus on the areas that actually need it:
- Under-eyes → to help prevent concealer from creasing
- T-zone → to control excess shine
- Other areas → wherever makeup tends to move or fade
How to Apply Powder
1. Use a small amount: Pick up the powder with a brush or puff and remove excess before applying
2. Press, don’t rub: Gently press or tap the powder onto your skin instead of aggressively buffing it over your makeup.
3. Choose your formula: Loose powder works well for lightweight, targeted setting, while pressed powder is convenient for touch-ups and can offer additional coverage.
If your makeup already feels comfortable, stays in place, and you prefer a natural finish, you can skip powder—or just lightly set your under-eyes and T-zone.
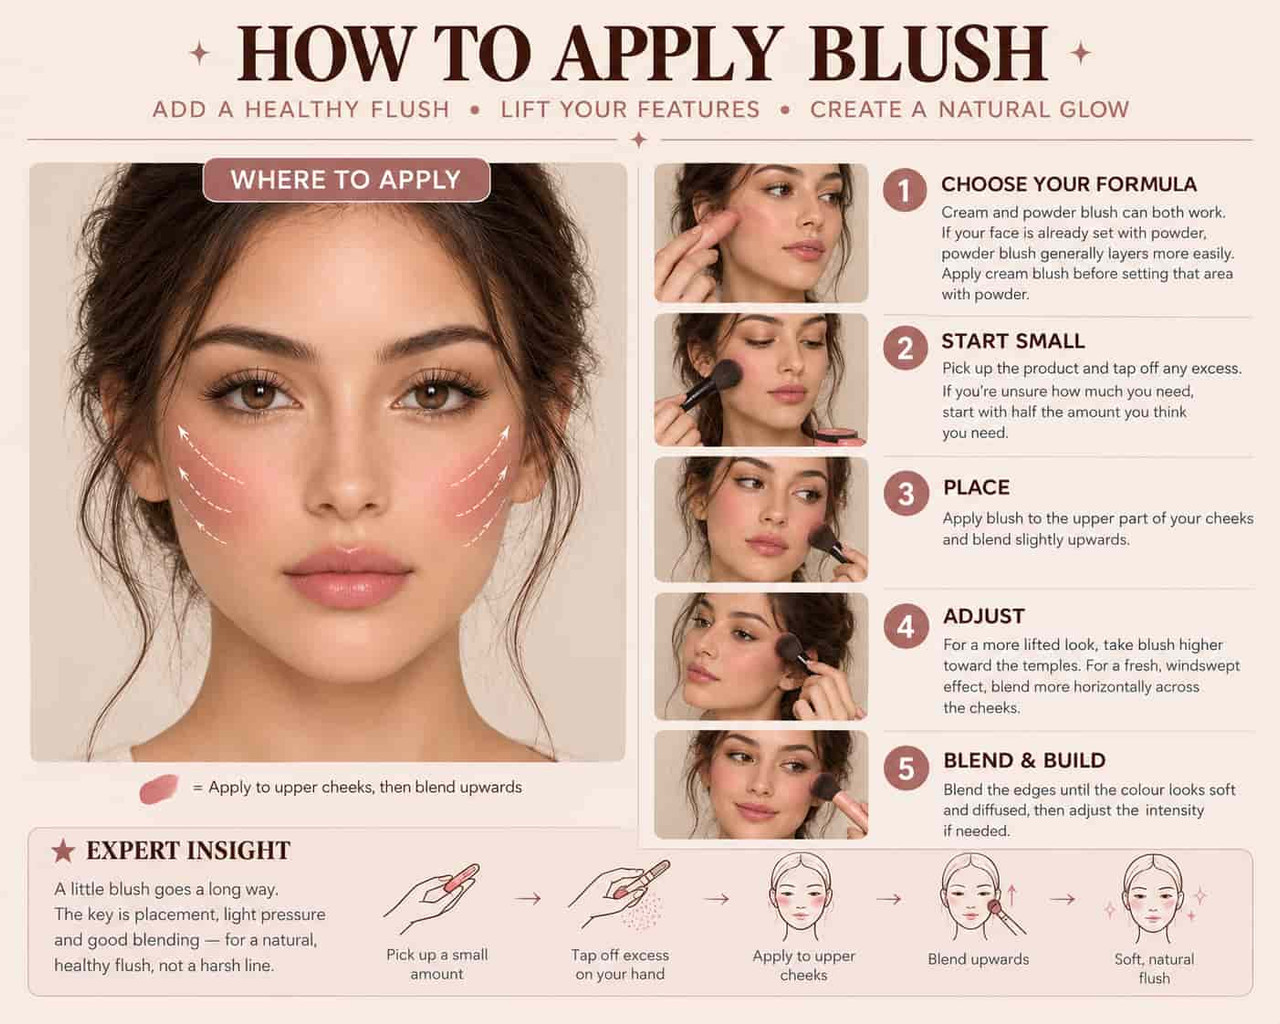
Step 6: Apply Blush
Blush can instantly make your complexion look fresh, healthy, and more alive. But It’s easy to keep adding blush without realizing how intense the colour has become. The easiest way to keep blush balanced is to check the colour as you go rather than judging it all at once.
How to Apply Blush
1. Choose your formula: Cream and powder blush can both work. If you’ve already set your face with powder, powder blush generally layers more easily. If you’re using cream blush, apply it before setting that area with powder for easier blending.
2. Start small: Pick up the product and tap off any excess before placing it on the cheeks. If you’re unsure how much you need, start with half the amount you think you need.
3. Place: For a reliable beginner placement, apply blush to the upper part of your cheeks and blend slightly upwards.
4. Adjust the placement: If you want a more lifted look, take the blush higher toward the temples. However, if you want a fresh, windswept effect, blend it more horizontally across the cheeks.
5. Blend and build: Blend the edges until the colour looks soft and diffused, then adjust the intensity if needed.
Blush placement isn’t a strict rule. Treat it as a styling choice and adjust the placement and intensity according to the look you want.
With your complexion and cheek makeup done, it’s time to define your brows and eyes.
Step 7: Define Your Brows Without Making Them Look Heavy
Your brows should frame your face, not become the first thing people notice. As a beginner, focus on enhancing your natural shape rather than completely redrawing your eyebrows.
How to Define Your Brows
1. Brush them into place: Use a spoolie to brush the brow hairs upward and outward, following their natural direction.
2. Fill sparse areas: If you have gaps, use a brow pencil or powder with light, hair-like strokes. Focus more definition through the middle and tail, while keeping the inner brow softer.
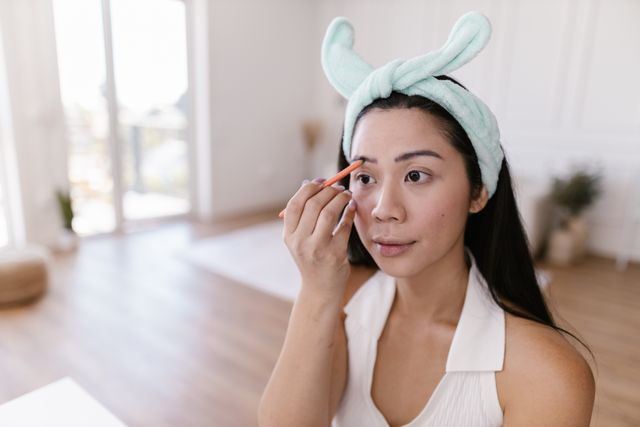
3. Choose a softer shade: For a softer result, choose a brow shade that works with your natural brow and hair colour rather than reaching for the darkest shade.
4. Soften the edges: Brush through your brows again with a spoolie to blend the product and remove any harsh lines.
5. Set if needed: If your brows already have enough fullness, you can skip filling altogether. Simply set them with a clear brow gel or brow wax to keep the hairs in place.

Step 8: Apply Simple Eye Makeup
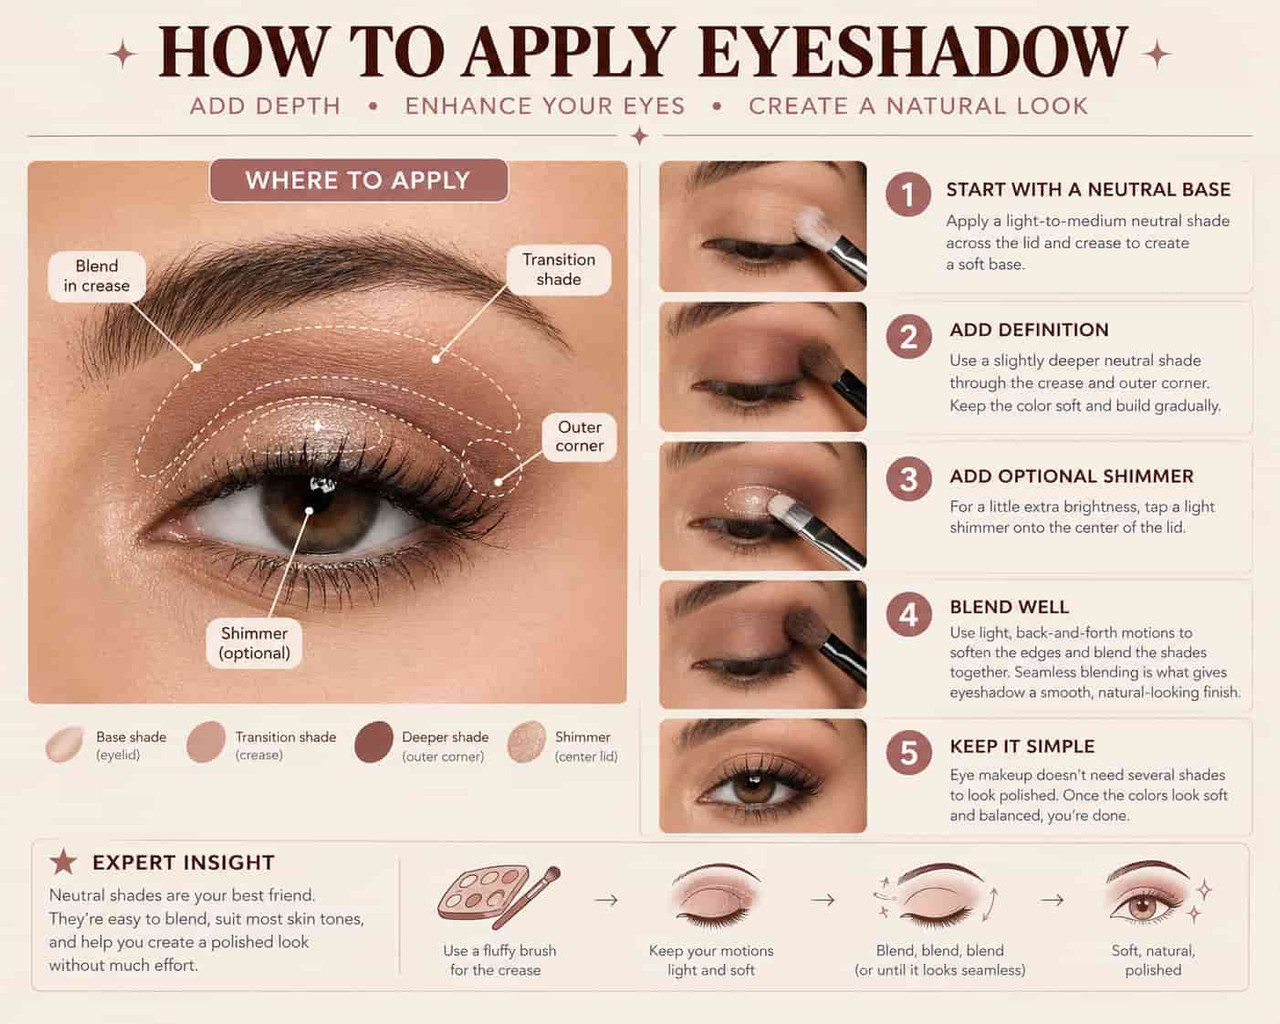
You don’t need a complicated eyeshadow look to define your eyes. Start with one or two neutral shades and build from there.
How to Apply Eyeshadow
1. Start with a neutral base: Apply a light-to-medium neutral shade across the lid and crease to create a soft base.
2. Add definition: Use a slightly deeper neutral shade through the crease and outer corner. Keep the color soft and build gradually.
3. Add optional shimmer: For a little extra brightness, tap a light shimmer onto the center of the lid.
4. Blend well: Use light, back-and-forth motions to soften the edges and blend the shades together. Seamless blending is what gives eyeshadow a smooth, natural-looking finish.
5. Keep it simple: Eye makeup doesn’t need several shades to look polished. Once the colors look soft and balanced, you’re done.
Step 9: Apply Eyeliner or Kajal (Optional)
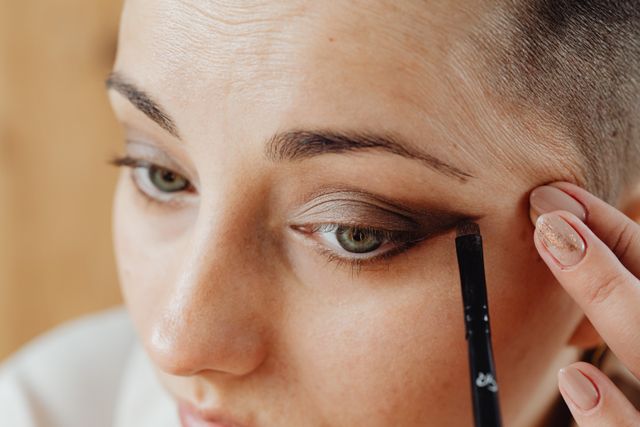
Eyeliner is optional, so don’t worry about mastering a perfect wing. For beginners, a pencil liner or kajal can feel easier to control than liquid liner.
How to apply eyeliner:
1. Keep it close: Apply a thin line along the upper lash line, staying close to the roots of your lashes.
2. Soften with eyeshadow: Use a small brush to gently blend the pencil with a dark brown or neutral-brown eyeshadow. This softens harsh edges and makes the liner easier to correct.
3. Increase the intensity gradually: If you want a more defined look, add another layer and soften the edge with eyeshadow.
This creates a soft, blended line that adds definition without looking too harsh.
Step 10: Apply Mascara
Mascara adds definition and can make your eyes look more awake. Avoid piling on too much product, as this can make your lashes look clumpy. Instead, build the formula gradually with controlled application.
How to apply mascara:
1. Curl first: Use an eyelash curler to curl your lashes before applying mascara.
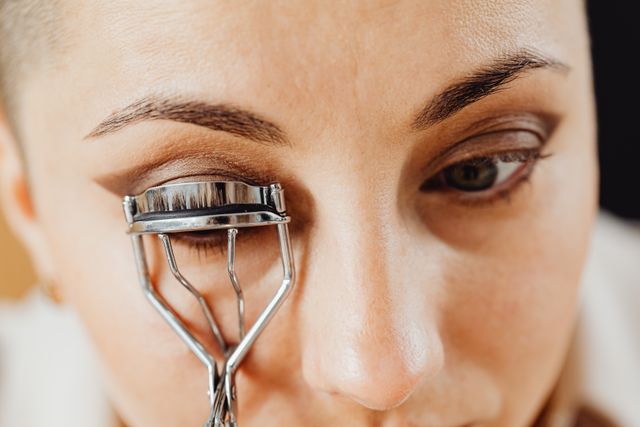
2. Start at the roots: Position the wand close to the lash roots and gently wiggle it upward toward the tips.
3. Build gradually: Apply one coat first. Let it settle down, then add a second thin coat if you want more volume or length, but avoid repeatedly layering wet mascara, which can create clumps.
4. Keep the lower lashes optional: Apply a small amount to the lower lashes if you want more definition, or skip them for a softer look.

Quick hygiene tip: Don’t share mascara or add water or saliva to a drying tube. Eye cosmetics can become contaminated, so replace mascara regularly and avoid using it if its condition has changed.
Once your eye makeup is done, let’s finish the look with your lips.
Step 11: Apply Lip Liner and Lip Colour
A simple lip routine can add definition and colour without requiring much technique.
How to Apply Lip Products
1. Prep your lips: Apply a thin layer of lip balm if your lips feel dry. Give it a moment to settle before lining.
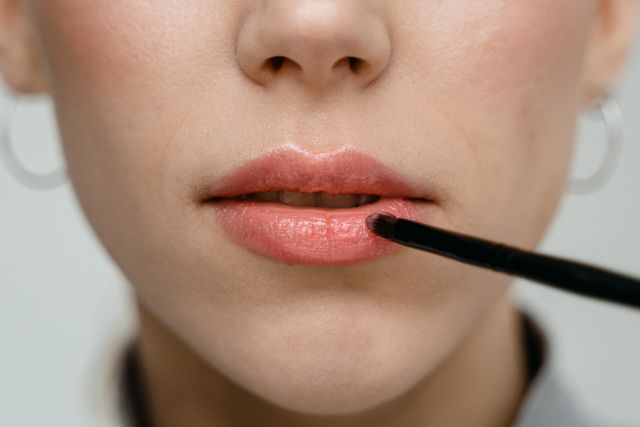
2. Define: Use a lip liner close to your natural lip colour and lightly trace your natural lip shape. You don’t need perfectly symmetrical lines—follow your natural shape and make small adjustments where needed.

3. Soften: Hold the pencil slightly on its side rather than pressing the sharp tip heavily against your lips. Use light strokes, then gently blend the liner inward with your fingertip or a small brush.
4. Add colour: Finish with lipstick, a lip tint, balm, or gloss. Start with a thin layer and add more if you want greater intensity.
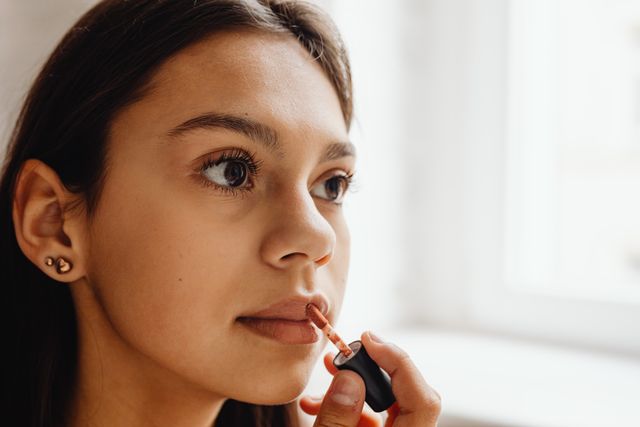
You don’t need to overline or create a complicated gradient. A close-to-natural liner paired with your favourite lip colour can define the lips while keeping the result soft and effortless.
Now that your makeup is done, it’s time for the final step, i.e., setting your look.
Step 12: Finish With Setting Spray (Optional)
You can absolutely skip setting spray. If your makeup already looks good and wears comfortably, you don’t need another product just because a tutorial uses one.
How to Apply Setting Spray
1. Shake the bottle: Mix the formula evenly before spraying so the product applies consistently.
2. Hold it at the recommended distance: Most sprays work best when held several inches away from the face, but check the product instructions for the exact distance.
3. Mist evenly: Close your eyes and lightly mist across your face in an even motion. Aim for a fine, even layer rather than saturating your skin.
4. Let it set: Allow the spray to dry naturally rather than immediately touching or rubbing your makeup.

A Simple 5-Minute Everyday Makeup Routine for Beginners
You’ve learned the full step-by-step routine, but you don’t need every step every day. For a simple makeup look for beginners, focus on the few products that make the biggest difference.

1. Prep your skin → Apply moisturizer and sunscreen to create a comfortable, protected base.
2. Even out your skin→ Use a skin tint, BB/CC cream, or light foundation. If you prefer minimal makeup, skip the base altogether and use concealer only where you need extra coverage.
3. Set only where needed → Lightly press powder over areas where concealer tends to crease or where makeup gets oily.
4. Add colour to your face → Apply a little blush for a fresh, healthy-looking flush. Add bronzer if you want extra warmth, or skip it for a simpler look.
5. Define your eyes→ Brush your brows into place and fill only sparse areas if needed. Finish with mascara to add definition to your eyes.
6. Add colour to your lips → Apply a lip balm, tinted balm, lipstick, or gloss for a little colour and hydration.
And that’s it! You don’t need to use every product you own every day—just pick the ones that help enhance your features and make you feel your best.

Common Beginner Makeup Mistakes to Avoid
If you’re still learning how to apply makeup as a beginner, these are some of the most common mistakes to watch for.
1. Using too much product too soon → Excess product can make the makeup look heavy and make blending more difficult. Start with the amount you need and assess the result before adding more.
2. Thinking every product is necessary → Use a product when it actually adds something to your look.
3. Ignoring the formula underneath → Consider what you’ve already applied before layering another product. As a general rule, apply cream and liquid products before powder to avoid patchiness and uneven layering.
4. Over-blending your makeup → Blend enough to soften the edges, but don’t keep moving the product around until you lose the coverage or definition you created.
5. Making your brows too dark → Keep the inner brow softer and concentrate definition toward the middle and tail
6. Confusing bronzer with contour → Bronzer adds warmth, while contour creates shadow and definition. Choose based on the effect you want.
7. Copying someone else’s exact makeup placement → What looks flattering on someone else may not work the same way for you. Use their technique as a starting point, then adjust the placement and intensity to suit your features and the look you want.
8. Trying to perfect every feature separately → Step back from the mirror and look at your whole face before adding more. Your brows, blush, eyes, and base should feel balanced together—not perfect individually.
Remember: Makeup is meant to enhance your features, not hide them. You don’t need more makeup; you need the right amount in the right places.
Learn: How to create beautiful, wearable autumn makeup looks.
How to Fix Common Makeup Problems
You don’t always need to start over. These small adjustments can often bring your makeup back into balance.
| If your makeup looks… | Try this |
| Too heavy | Remove excess with a damp sponge or clean brush, then soften the edges. |
| Concealer looks dry | Gently press a damp sponge over the area to soften excess product, then avoid adding more powder. |
| Bronzer looks harsh | Blend the edges with a clean brush and remove excess product if needed. |
| Blush looks too strong | Soften it with a clean brush or lightly press a little base product over the area. |
| Brows look too dark | Brush through them with a clean spoolie to soften the colour and remove excess product. |
| Makeup feels like “too much” | Step back from the mirror and soften or remove the feature that looks most intense. |
Final Thoughts
If you’re still learning how to apply makeup step by step, keep your makeup routine simple and give yourself time to practice. When you’re new to makeup, it’s easy to assume that more product, more coverage, or more steps will give you a better result. In reality, good makeup is about using what you need, applying it with control, and knowing when to stop.
Read: How to build your first makeup kit as a beginner
FAQs
1. What is the correct order to apply makeup for beginners?
For a simple makeup routine for beginners, start with moisturizer → sunscreen → foundation or skin tint → concealer → powder where needed → blush/bronzer → brows → eye makeup → lips → optional setting spray.
You don’t have to use every step every day. Skip products you don’t need and keep your routine as simple as your desired look.
2. What is the first step in makeup for beginners?
The first step is skin prep. Start with moisturizer, then apply broad-spectrum sunscreen during the day and allow your skincare to settle before applying makeup.
3. Do I apply concealer before or after foundation?
For beginners, it’s usually easiest to apply foundation first and then use concealer where needed. Foundation evens out your overall complexion, making it easier to see where you still need extra coverage and avoid using more product than necessary. You can also apply concealer first for spot concealing or very light makeup—it’s simply another technique, not a strict rule.
4. Can I apply makeup without a primer?
Absolutely. Primer is optional, not a required step in a beginner makeup routine. If your moisturizer and sunscreen leave your skin smooth and your makeup wears well, you can skip it; use primer when you have a specific need such as extra hydration, oil control, smoother-looking texture, or better grip.
5. How much foundation should you use as a beginner?
There’s no one-size-fits-all amount because coverage varies by formula and the look you want. Start with a small amount, blend it into a thin layer, then assess your skin before adding more—especially around areas that need extra coverage. This gives you more control and helps prevent a heavy, cakey-looking base.
6. How do you apply makeup naturally as a beginner?
For a natural look, use a skin tint or light foundation, conceal only where needed, then add subtle blush, softly defined brows, mascara, and a natural lip. The goal is to even and enhance your features without making the base look heavy.
7. Can beginners apply makeup without foundation?
Yes. You can skip foundation and use concealer only where you need extra coverage, or use a skin tint/BB cream for a lighter finish.

Pingback: Makeup For Beginners: The Ultimate Guide To Building Your First Makeup Kit
Pingback: Why Does My Makeup Look Cakey? The Complete Guide To Smooth, Flawless Foundation
Pingback: How To Clean Makeup Brushes And Sponges: A Complete Guide 2026
Pingback: Fall Makeup 2026: Trends, Colors & Easy Looks To Try